Table of Contents
Technical Support
Request for support - ASTER
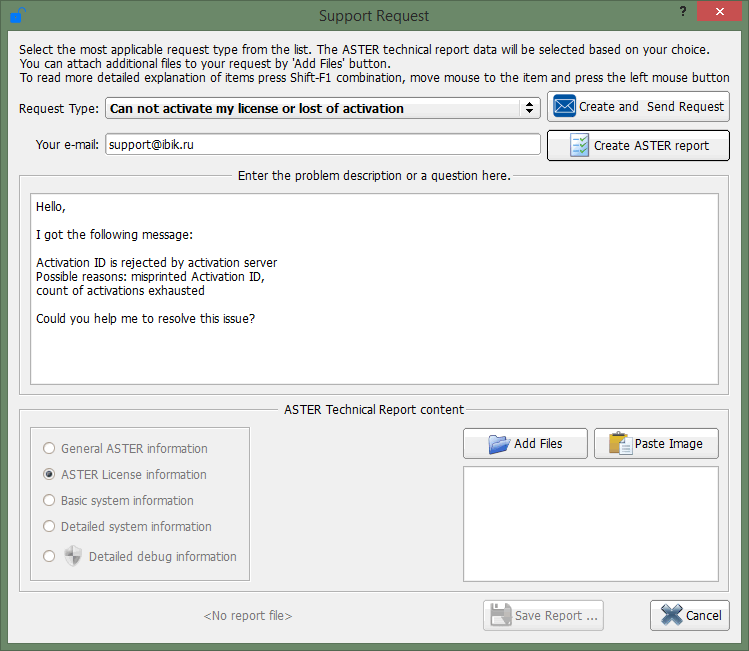
For technical support, click this button  in the lower right corner of the ASTER Control Panel. In addition, for most error message, a similar button is available in the error window. For example, if you click on the «Support» button in the activation error, you will see the following dialog box:

The text describing the problem (for above error) will be automatically generated based on the text of the error message.
Support Request Types
When you request for support, choose the most appropriate request type to match your situation from the list Request Type (When the error message windows open, most suitable type will be selected automatically). Based on the choice, the contents of the ASTER technical report will be generated, i.e any date that will help to solve the problem will be collected and sent to the ASTER support service (See. Standard report types in ASTER).
Available types of requests are as follows:
- «Just a question» This option is chosen when there is no real problem, and you just want to ask questions about ASTER, its capabilities, limitations, etc. In this case, the minimal information concerning ASTER will be included in the report file. (See. Standard report types in ASTER).
- «I cannot activated the ASTER or activation fails», By default this will be selected, when activation error occur. Select this option if the error involves license activation. For example, when the activation of the program suddenly disappears. In the report file, in this case, data regarding ASTER licensing will be included (Option «ASTER license Information»).
- «ASTER doesn't start or gives an error at startup» This is automatically selected when there is error with ASTER program. You can select this option if this describes your issue closer that other options. A data file will be included in the report when you chose this option (Option «Basic System Information»)
- «Computer freezes, reboots or «Bugs» should be selected, if after installing ASTER program windows starts having problems: hanging, rebooting or crashing «Blue Screen Of Death» and other issue with operating system which didn't occur before installing ASTER. This report will include «Detailed System Information».
- «Other Problems» should be selected if you are unable to decide which option in request type matches your problem. The report will include «Basic System Information».
By default, the content of the ASTER technical report is selected based on the selected request type, however, the content of the report can be adjusted in one of the following ways:
- Select the standard report type using the radio button under the description field.
- Add files to your report from your computer which is relevant to the problem and may help to resolve the problem by our support team.
- Add screenshot or windows clipboard data to the content of the report (For example, a screenshot or copied text).
Description of request and Email address
In the field «Enter a description of the problem or your question» We recommend you to describe your problem with as much details as possible or ask your question of interest or concerns.
Do not skip writing the description, if you would like to get solution to your problem or proper answer to your queries as soon as possible.
When you open the «Support Request» dialog box from the error message box, then description will be generated automatically from the error text. You can add more details about the issue as well. However, please leave the error message text unchanged.
The email address field is mandatory and is filled automatically from the registration data if there is registration (license) for ASTER. This field may have incorrect or outdated email, if yes, then please change it to correct current email of yours so you can receive response from our support team
Standard report types in ASTER
After selecting the type or request, then content of the ASTER report is generated based on one the standard report types listed under the description field of «Support Request» dialog box.
If required, you can (For example, at the request of the support service), change this selection using the radio buttons. The amount of information included in the report increases depending on the selection from top to bottom, i.e, the report type below contains information that is contained in the report types above and adds additional data to the report. For query type «Just a question» and «Cannot activate ASTER or activation failure», the report type is fixed and cannot be changed.
Type of reports and data contained in them:
- «Basic Information ASTER» It collect the minimum information for report. IT collects information such as, ASTER version, services status, license details as well as number of workplaces and any ASTER errors (if any).
- ASTER License Information collect additional information in addition to above report. It collects windows registry and over data required for licensing, activation and registration.
- Basic System Information In addition to above two reports this collect windows registry keys used by ASTER and structure that allow the developer to reproduce the configuration of the workplaces as well as the output from the “SystemInfo” system utility.
- Detailed System Information It contains the same data as “Basic System Information” however it collects details using MSInfo32 utility instead of SystemInfo which produces more details information. When the MSInfo32 tool is running please do not click “Cancel” button on the information box, otherwise the collected data will not be included in the ASTER Report.
- Detailed Debugging Information This report includes the windows mini-dumps (small memory dumps that windows creates in case of system crash and stores on disk). Collecting this data required administrative privileges, so the radio button corresponding to this report and has shield icon to denote that it requires administrative privileges. In case you have not enabled mini dump a message will appear, click “Yes” button to turn it on. This report should send after you have encountered BSOD. Only then there will be mini dumps. If there are no mini dumps, you will receive an appropriate message. When attaching mini dumps, it will increase the size of the report, thus you may encounter issue in sending or forwarding the report by email. So, this is only required to be done, only if ASTER technical support request it.
Adding files and clipboard content to the report
You can add additional files from you computer to the report, if you think the files will be helpful in solving the problem or an ASTER support staffs asks for additional files.
The button Add Files opens a standard open dialog box from which you can select the files to you added to the report. The selected files are displayed in the table below the button. By clicking on the name you can open them to check or edit them. To delete a file from the list, click the “X” button on the left of the file name
Do not add many files in the report as it increase the size of the file and may prevent it from being delivered to the ASTER support. Also, some files are filtered in the email server thus attach only required files.
In addition to the files, you can also add the content of the clipboard to the ASTER report. This is convenient when you want to add screenshots. Just take screenshot using “Alt + PrintScreen” combination and then press “Insert Picture” button:

The text in the button Insert.. depends on the content of the clipboard:
- Insert Picture - if the clipboard has an image or a screenshot.
- Insert plain text - If the clipboard has unformatted text like from a notepad
- Insert Formatted text (html) - If the clipboard has formatted text like from a Microsoft word document.
When the button is clicked, the files will be given temporary names like “Clipboard_N” with appropriate extension and are added to the report. You can view the contents of the files by clicking on the file name. The file will open on appropriate application and you can use it to edit the information in it like hiding sensitive information or selecting required window in a screenshot. Files created from clipboard are assigned unique name by the windows so they do not match the file in the list. To get the real name and folder of the files, move the mouse pointer to the file and a tool tip will display the full path of the file.
Try to make the size of the screenshot as small as possible so use “Alt + PrintScreen” key combination which only takes screenshot of the active window, rather than while desktop if you press only “PrintScreen” button
When the «Support Request» dialog box is opened from error message windows, it opens in modal mode, which will prevent access from control in the “ASTER Control Panel” until you close the dialog box. There for you will find it little difficult to take screenshot of the “ASTER Control Panel”.
There are two possible solution for this“
- Firstly, Move the Support Request dialog box to the side so that “ASTER Control Panel” is visible and take screenshot of the entire desktop by pressing the “PrintScreen” button. The resulting image can be edition in any graphics editor in order to hide sensitive information in it.
- Secondly, copy the auto generated error description to the clipboard. then close the dialog box. Now, click the “Support Request” button on the bottom right corner to open the dialogbox again. This time, you can access the main windows and take screenshot easily. After the dialog is open, do not forget to paste the error description that was saved in the clipboard earlier.
Sending a report
After you have typed in the description of the problem and chosen the type of technical report, you must send a request to the support server of ASTER.
To do this, click the «Send» button. Please make sure the email address entered in the report is correct email address. in the «Your email address» field. After clicking the button a compressed zip archive will be created and send along with the description of the problem to ASTER support service. This may take few minutes to complete, so do not close the windows till them.
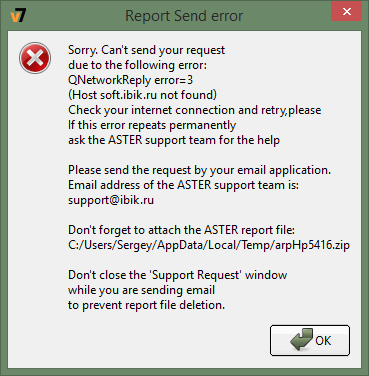
When the report is successfully sent, a success message will appear, which will mention the support request number. Please make a note of that number so you can contact us directly in case you have any more input. And in case the sending fails, an error message will appear as below:

The description of the error may vary, depending on the cause of the error, in this case, sending report
Follow these steps to create a report without automatically sending it using the Support Request function in ASTER:
- click the «Support Request» button
- Select the required report parameters
- Add screenshots and other files, if necessary
- Click the «Create ASTER report»
- Click «Save Report…»
- Now, attach the report file to an email and send it along with problem description to : support@ibik.ru.